Ever wanted to run SteamOS and Windows side-by-side on your Steam Deck without having to reinstall the OS? At the end of this tutorial, you will achieve being able to dualboot between Windows 10/11 and SteamOS. Your installed games on SteamOS will be preserved, unless something goes wrong during the partitioning stage of the tutorial.
This guide should take at most 1 hour of your time, however it is heavily dependent on the read/write speed of your USB Flash Drives and internal storage in your Steam Deck.
Heads Up
It’s come to my attention that some other dualbooting guides have been recommending Clover as a UEFI Bootloader for the Steam Deck.
Clover is incredibly outdated and was only commonly used for Hackintosh purposes. I will not support Clover usage with my guide. Consider rEFInd instead – my previous post provides more detail on what it is and where to get it.
Requirements
You’ll need the following ingredients:
- A Steam Deck. Please ensure it’s fully charged before continuing. I did this guide on a manually-upgraded 512GB NVMe model. If you have a 64GB eMMC Deck then it’s pretty easy to upgrade it to a higher capacity NVMe module. Of course, proceed at your own peril.
- A compatible USB-C Dock, or USB-C Hub. We’re going to need to be able to type things, as well as run USB flash drives. Unfortunately, the Deck only has one USB-C port. In a pre-publish test I used the official Valve Steam Deck dock, which features extra USB ports amongst other connections.
- Figure out how much disk space you want to give Windows. For this tutorial, we’re going to give it 80 GB of disk space. Windows Setup complains if it doesn’t install to a partition that isn’t 50 GB or more, but won’t prevent the install unless the partition is super small. 40GB minimum recommended.
- A copy of Manjaro. You can download it from here (see screenshot below). I chose KDE Plasma and the “Lite” version, which is just barebones environment with the tools we need. Clicking the link above will take you to the Manjaro download page and select x86_64 when prompted. Then choose KDE Plasma, and this will appear.

- A copy of Windows. I honestly recommend Tiny11, which is a slimmed down full Windows, just without garbage attached to it. Grab a copy from the Internet Archive (currently the 23H1 version). Beware of imposter websites that use file hosting sites like RapidGator, MediaFire, etc – they could be tampered copies!
- Rufus USB Formatting Tool. Download it from their website, just pick the Portable version. At the time of writing, that version was Version 4.2p dated 2023/07/26.
- 2 USB Flash Drives. Ensure they are at least 8GB in capacity. One will be used for Manjaro, the other will hold the installer for Windows. Ensure the USB Flash drives are fairly speedy, or you’ll have very long wait times. I don’t recommend HP-branded USB drives due to slow write speeds.
Drawbacks
As with any dualboot configuration, you’ve got some drawbacks. I’ve listed the ones that pop up the most when talking about dualbooting below.
- You lose some internal SteamOS game storage space to make room for Windows. We will be resizing the Deck’ user data partition and as such this partition holds your Deck’ user data and games. If your Steam Deck is full, stop here at this step, uninstall some games or move them to a high-speed microSD card then continue.
- Unless you use a Linux filesystem driver for Windows, you won’t be able to access SteamOS games. You may need to invest in a portable HDD/SSD to store your Windows games. USB 3.0 SSDs have really good performance with the Deck, even if you get a empty USB 3.0 SATA caddy and slap a cheap SSD from AliExpress in there. Store-brought USB SSDs are stupidly overpriced here in Australia…
Speaking of upgrading the Deck SSD…
iFixit has a great guide on how to upgrade the Deck SSD. I upgraded my Deck’ 512GB module to a 1TB Corsair MP600 Mini module that was Steam Deck compatible for less than $200 AUD. And it wasn’t too difficult to disassemble and reassemble the Deck either.
Let’s get started!
Time to get down and dirty. This section will be on rapid-fire, so try to keep up. Of course, if you get stuck, let me know and I’ll do the best I can to assist.
Prepping the Manjaro USB
Unplug ALL devices that might come up as a USB Flash Drive. This is a precaution because there might be a chance you format the wrong flash drive. Once all of them are unplugged, plug in the one that is to be formatted.
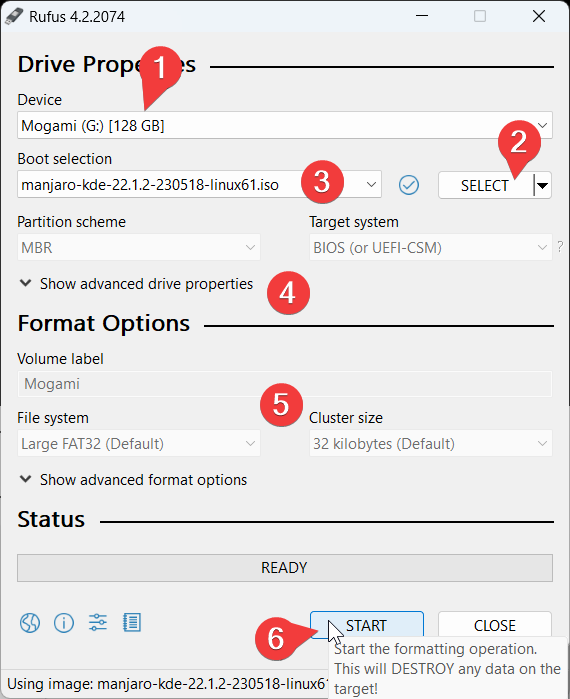
Select the disk to be formatted (step #1), followed by making sure “Disk or ISO (please select)” is shown in the Boot Selection drop down list.
Hit SELECT (step #2) and select the Manjaro disk image (ISO) you acquired earlier. You may get a message about something being ISOHybrid format, just ignore that and continue. It should now appear in the drop-down list (step #3). Leave everything as is as pictured by steps #4 and #5.
Take a deep breath and click START as seen in step #6. Read and answer the following prompts carefully and wait until it’s completed.
Depending on the write speed of your USB drive, this can take up to 30 minutes to complete… or longer. Grab a tea or coffee while it writes to the disk. Once things have finalized, keep Rufus open and safely eject the USB flash drive.
Keep it somewhere safe, we’re gonna need it shortly.
Prepping the Windows USB
Note: This can be done “in the background” while you get the Steam Deck partitioning done. Just set Rufus up and let it run, then focus on the next step. When complete, come back here and continue onwards.
Now, we need to repeat the process but with the Windows copy we downloaded. For this example, I will use Tiny11 by NTDEV.
You can use whatever version of Windows you’d like, just ensure it’s not an outdated copy of Windows 10 at the very least (I recommend at least 22H1 for Windows 10). Note that Atlas OS did not work on the Deck (it blue screened when installing drivers).
Insert another USB Flash Drive. Rinse and repeat using the image below as your guide:
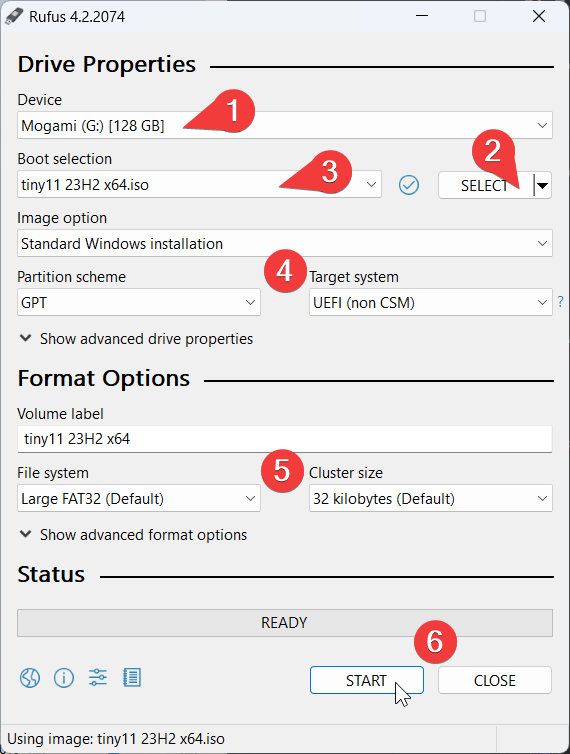
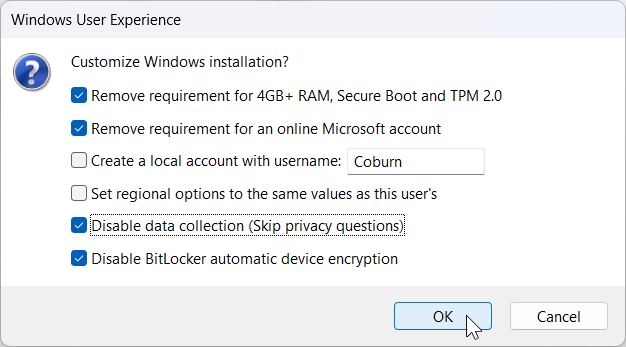
Note that a new option will appear called “Image option” – you want to make sure that is set to “Standard Windows Installation“. You may also get this dialog – feel free to pick options if you so desire.
Once that’s done, have both USB flash drives on hand. It may help to mark which one is which, but the prep work is complete. Let’s move on by turning off your Steam Deck completely.
Now, we need to boot Manjaro. Connect your USB Dock/Hub or USB-C to USB-A adapter to your Deck and then plug the Manjaro USB into the Dock/Hub/Adapter. USB port(s) or the USB adapter.
Side A: Chopping Up The Disk
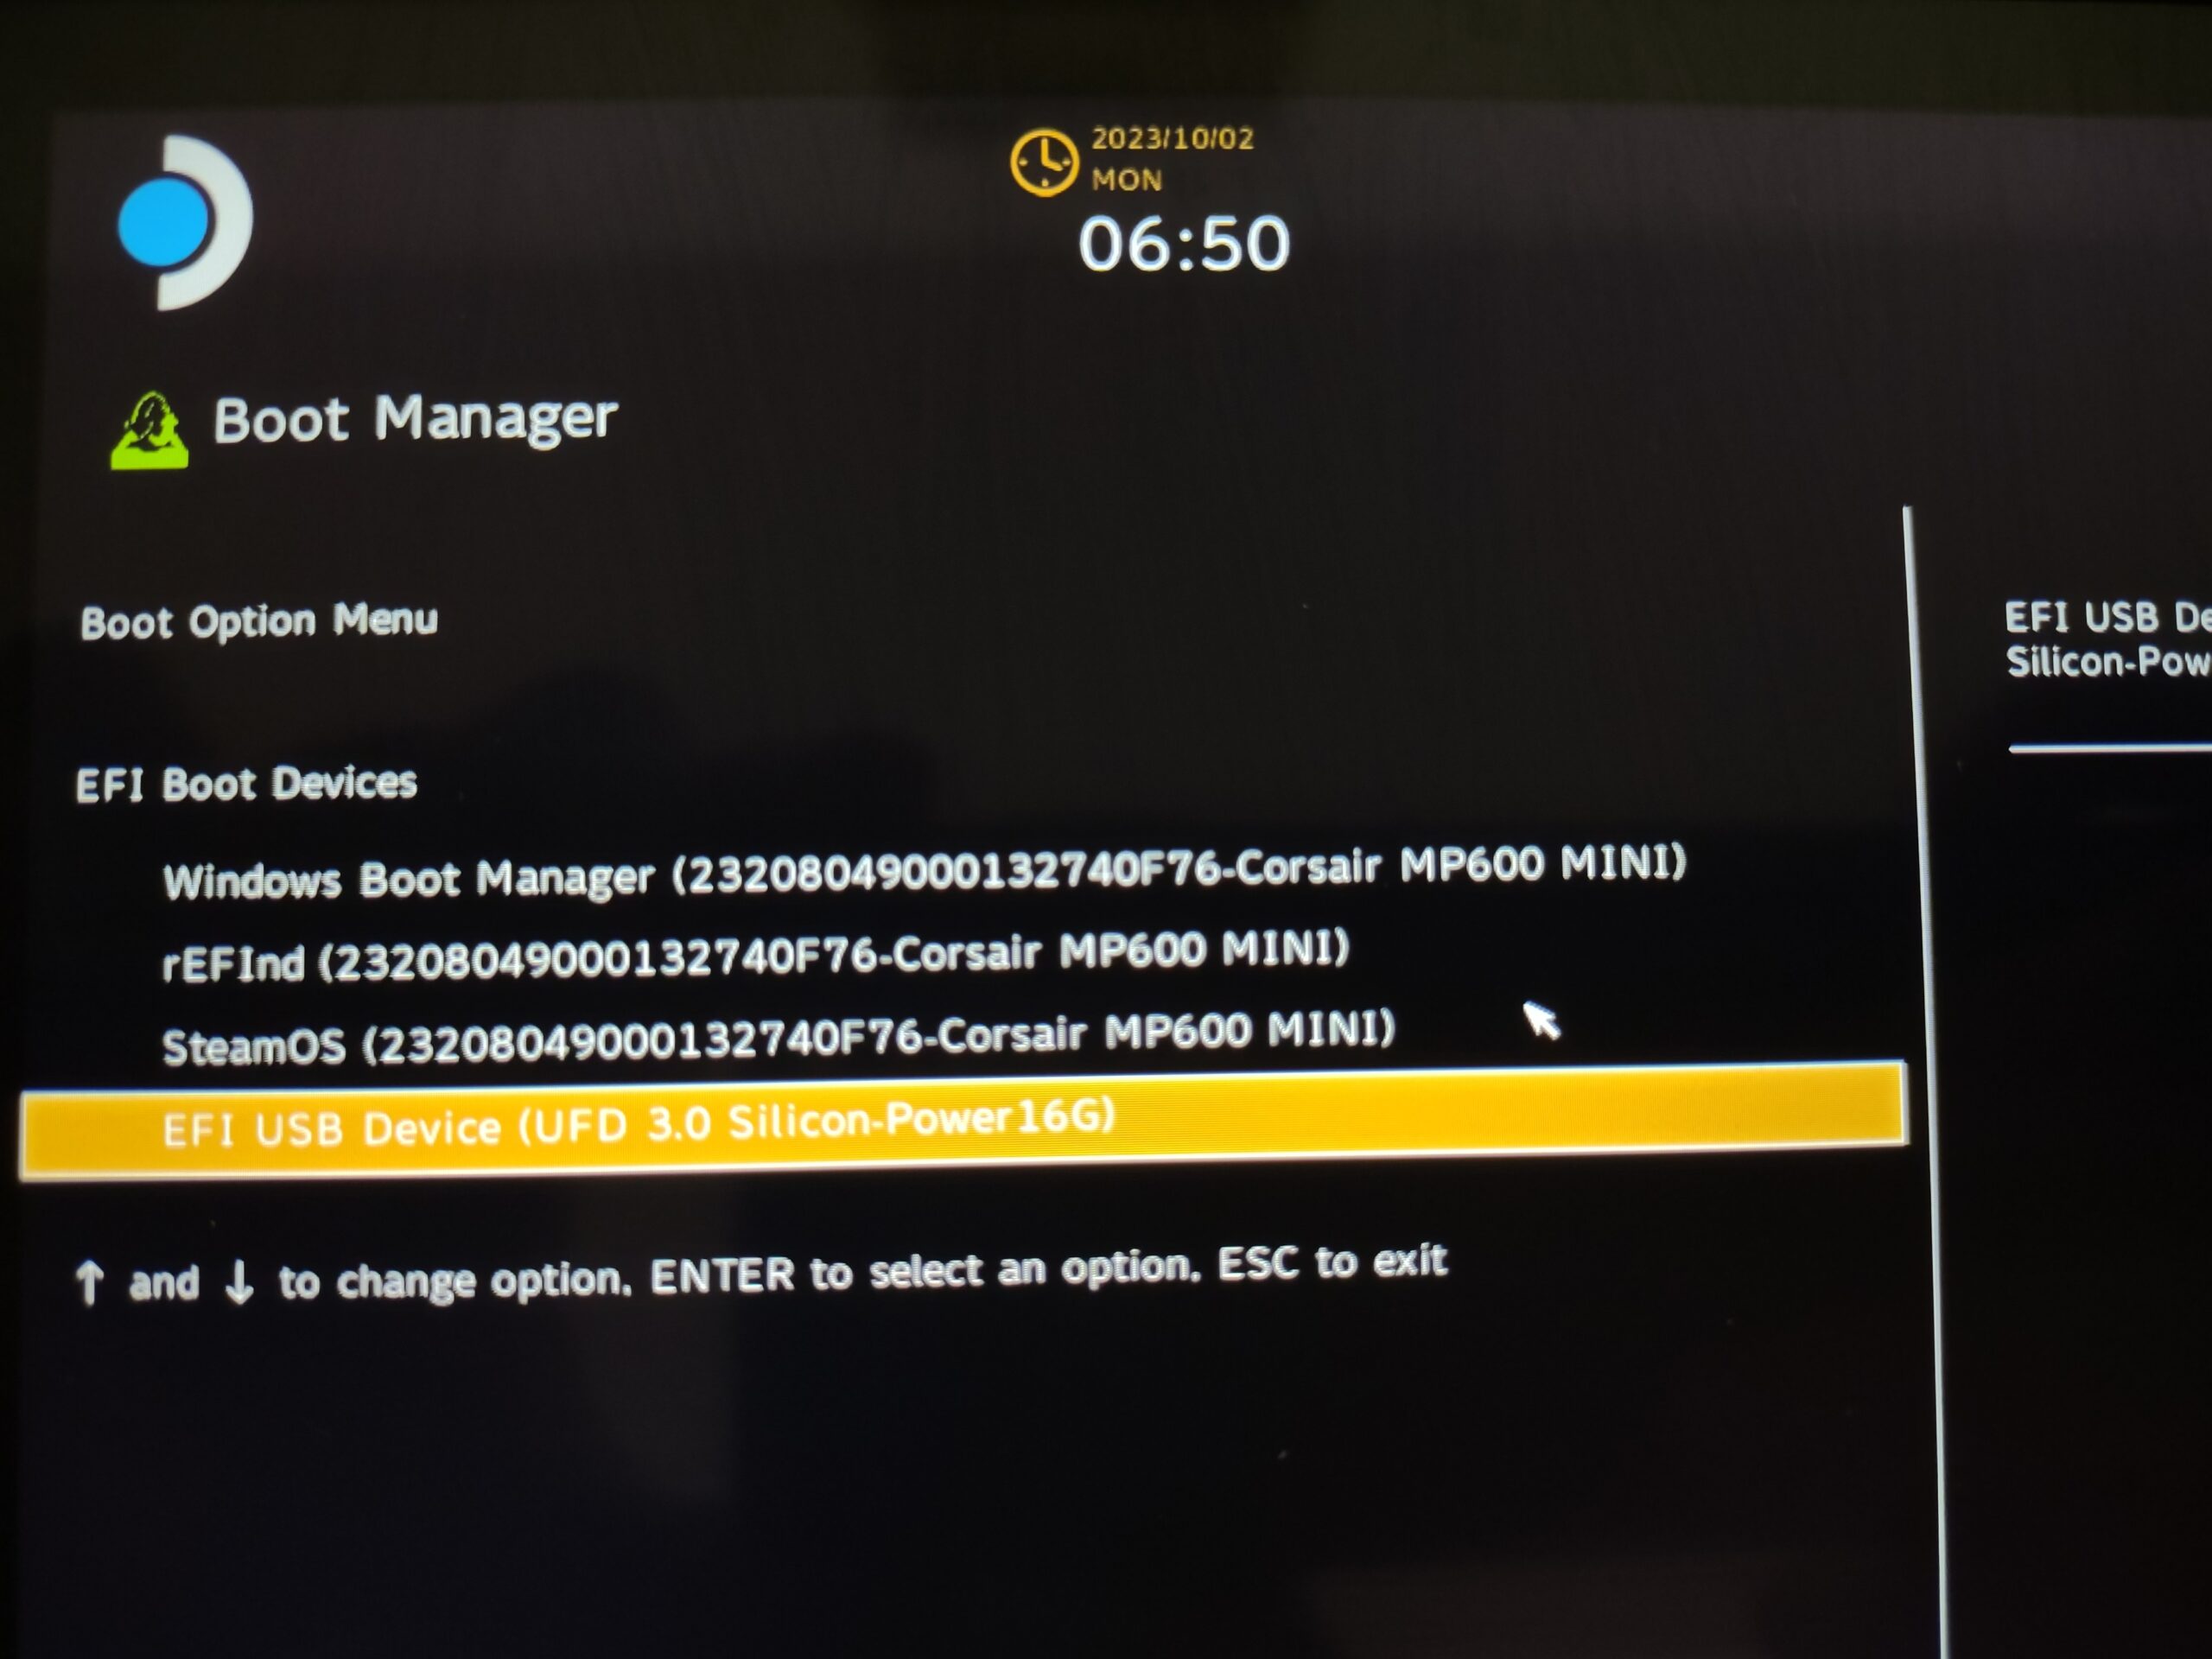
While holding Volume Down which is on top of the deck (the one closest to the left shoulder button), press and hold Power. You should hear a short tone.
Release Power, and keep holding the Volume Down button until you get the Steam Deck Boot Menu. You want to find your USB drive from the list – it may say something like “EFI USB Device (SanDisk Blade)”. Select it via the D-Pad, then hit A to boot from it. Tapping it also works.

Once the Manjaro boot menu loads, use the D-Pad to move up and down, A to select and B to go back. You want to select “Boot Manjaro with open source drivers” which is probably the default option. Leave the other options as default, that’s not going to matter for now.
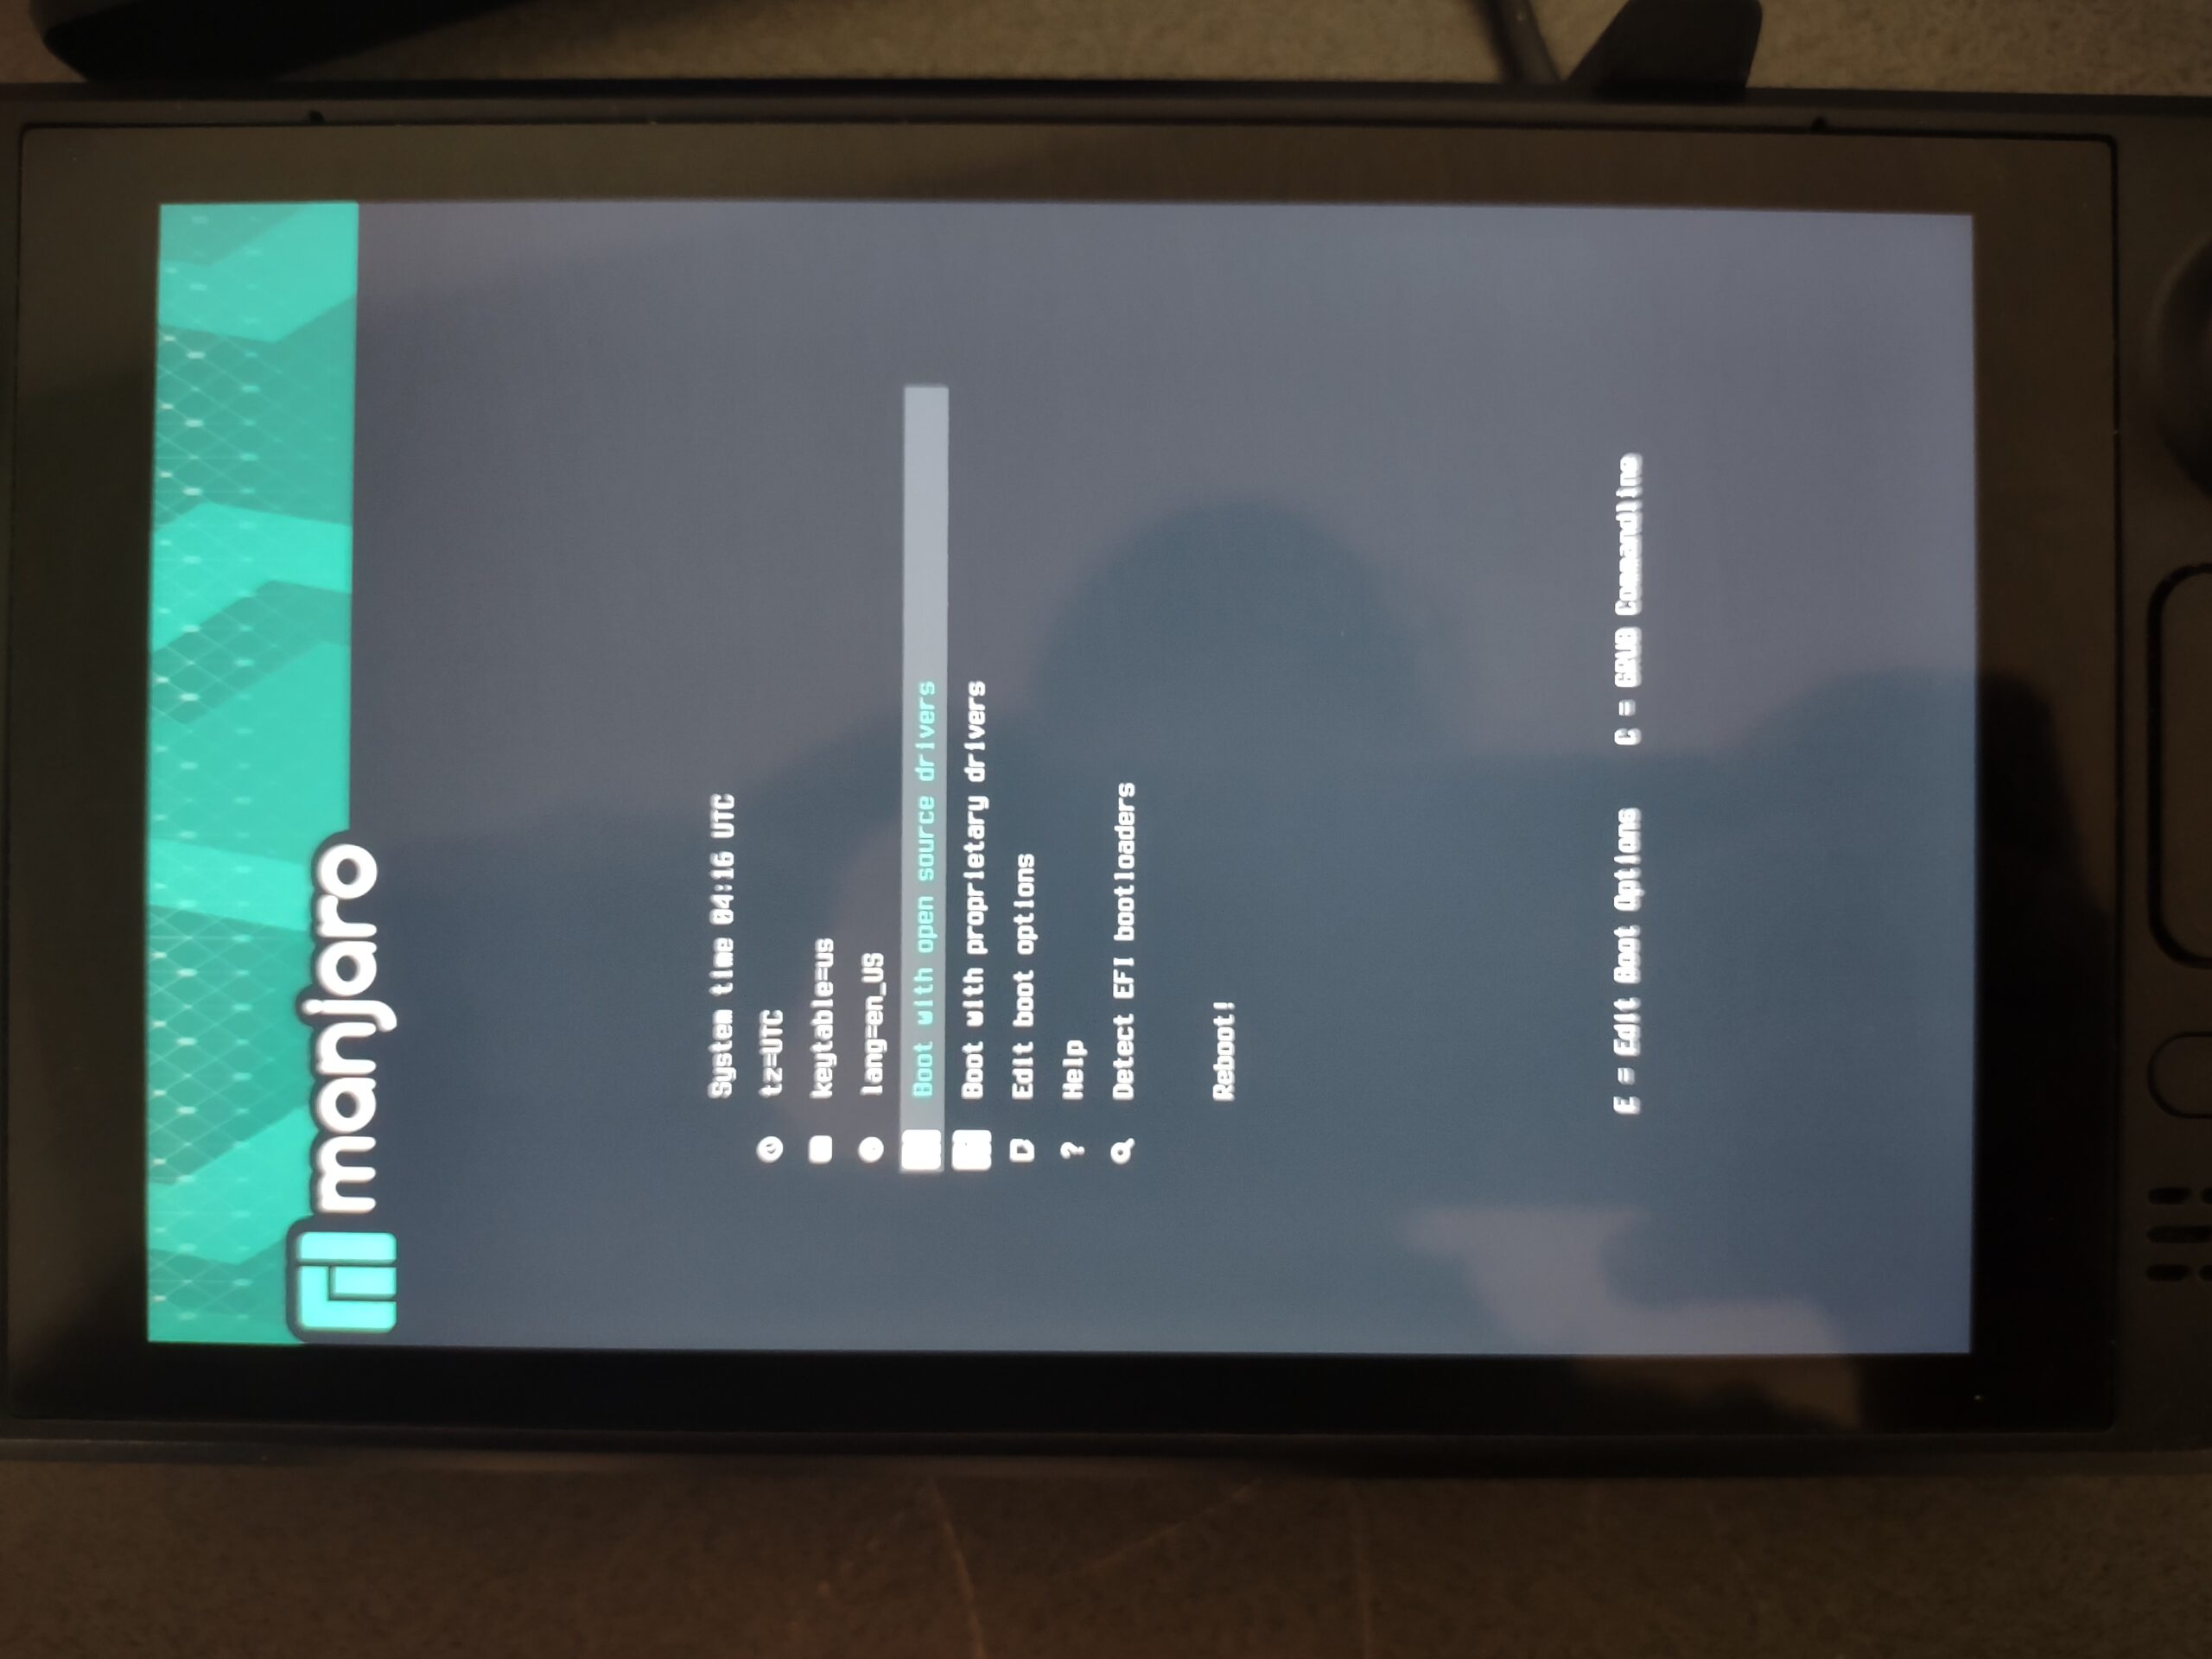
Give it some time and Manjaro will be fully booted on the Deck. The screen will be in Portrait rotation because of reasons. Annoying, but we’ll fix that next.
Fixing The Resolution
Do your best to find the Display Settings: just go to the Manjaro menu and in the search box, type “display” – and set the screen back to landscape by selecting the 4th option as shown below.
2nd option causes the screen to be landscape, but flipped upside down. If you’re not using Manjaro or KDE, you’re on your own for that and will have to substitute.

We need to use the KDE Partition Editor, which is again accessed via the Manjaro Menu. Look for it under the “System” category. You’ll see “GParted” there that can do the same job, but for this tutorial just ignore it.

Side A: Under The Knife
Once the KDE Partition Editor loads, you will be presented with a graphical interface and a list of partitions on your internal storage, like so:
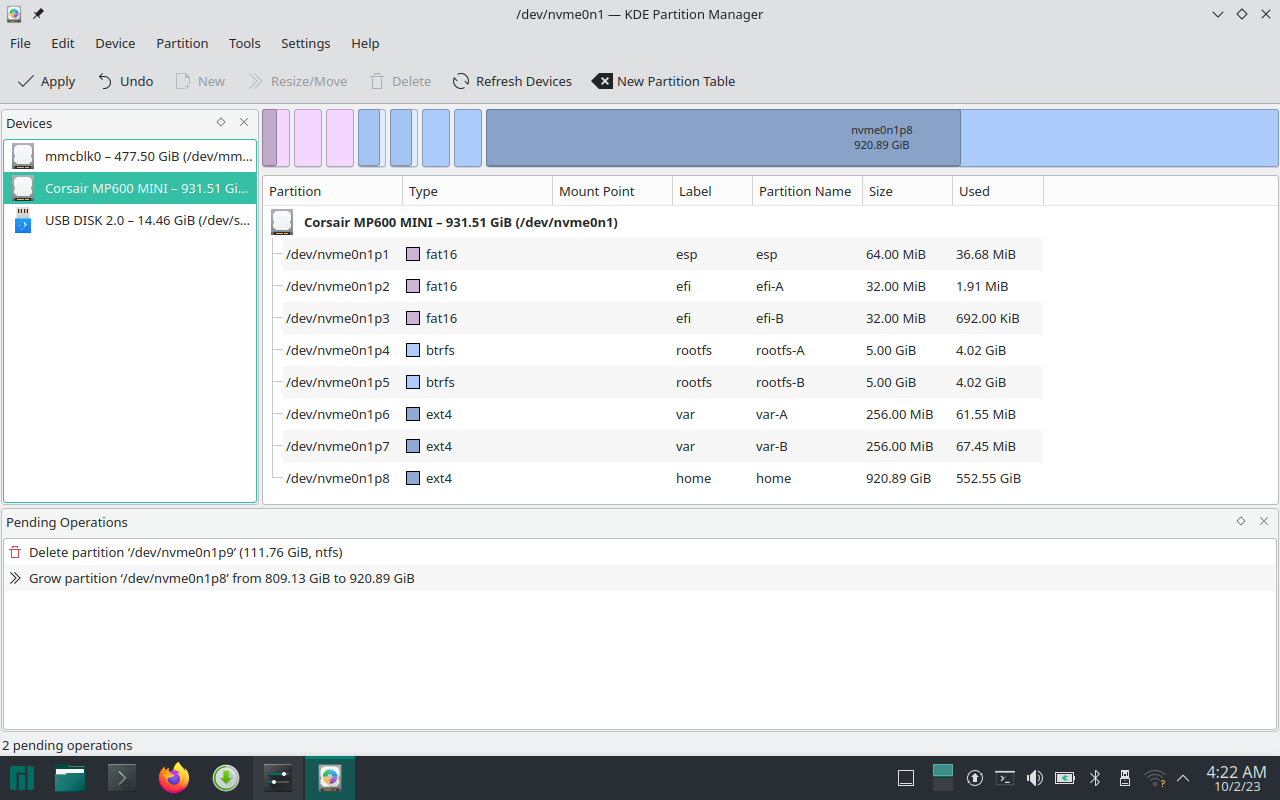
Note that you may see other entries like the ones on the left of the screenshot above. If you have a microSD inserted, it will appear as mmcblk0.
Pay very close attention to the device you’ve selected to partition. The USB you used to boot Manjaro will show up as a plug. You have been warned and I will not be held responsible for data loss!
partitioning
The partition we’re going to be resizing is the last partition you see in the graphic representation of the disk which should be nvme0n1p8. Ignore the pending operations, I have simulated what yours might look like.
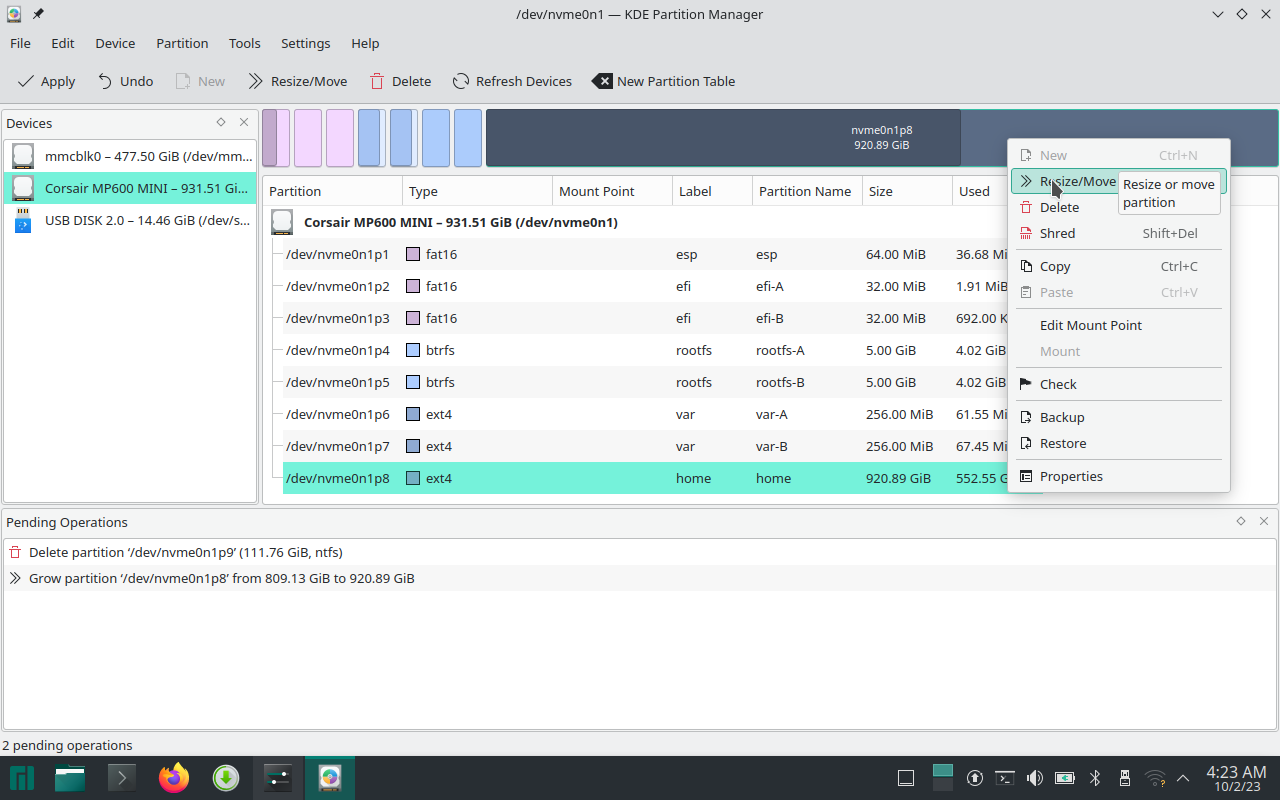
We want to right click on the entry in the table, or the last part of the graphic near the top of the screen and choose Resize/Move Partition:
Next, decide the value to shrink the partition with. As stated earlier, we’ll use 80 GB.
We need to convert this to MiB (Mebibytes) so simply take the number of gigs you want to give Windows and multiply it by 1024. 80 * 1024 = 81920. Then use that number as your “Free space after” value.
 I recommend clicking into the “Size” box after entering the number into the “Free space after” box to ensure the value sticks.
If – for whatever reason – that “Free space before” is not zero, then cancel and try again. Sometimes the program gets a little confused.
Just remember you cannot resize the partition smaller than the minimum size value shows. When happy, hit OK. A new entry appear in the table that says “unknown“. This represents free, empty space that you just created:

Creating the Windows Partition
We’re going to air-drop Windows system partition into that space, so right click on it and choose “New”. Select “ntfs” under File System. You can give it a label (filesystem name) if you so desire. Accept the rest and click OK.
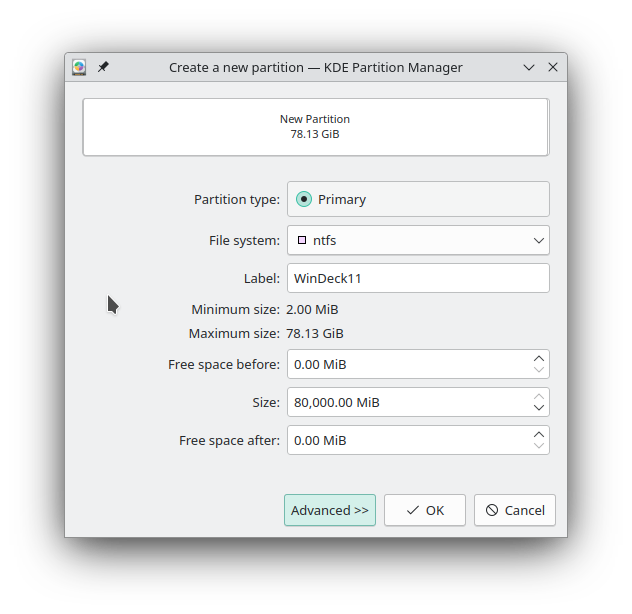
That empty space will now be a Windows NTFS partition, which is what we’ll be installing Windows to. Cool, huh?
When you’re ready to let the software chop up the disk, hit Apply. Carefully review the operations pending and then continue. Things will take some time to complete, so grab another tea or coffee.
Once complete, the software will let you know the result. At that stage, close the Partition Editor, then go to the Manjaro menu to click Shutdown, confirm it from the Leave dialog and let the Steam Deck power down.
Checkpoint
This can be skipped if desired. Before we continue, we need to boot back into SteamOS to ensure that Steam hasn’t gotten upset with us moving stuff around behind its back.
To do this, simply power up the Steam Deck without pressing any other button (apart from the Power Button to turn it on) and let it boot into Steam.
Once it’s booted, ensure that your games are detected and that the storage capacity readout has decreased. If all is well, then congratulations! You may now move onto the next part of the guide. If not, then leave a comment and I’ll try to help you the best I can.
Side B: Windows Setup
Again, I’ll rapid-fire this part. Try to keep up! The Windows Setup is easier than the partitioning phase of things and fast too.
Booting Setup
- Eject the Manjaro USB from your Steam Deck.
- Insert the Windows Setup USB.
- Power up the Steam Deck to the Boot Menu again by press and holding Volume Down and Power. Release the Power button after you hear the beeps, but keep holding Volume Down.
- Use D-Pad to select the USB device again and hit A to confirm.
Note that you might see two entries, UEFI Partition 1 and UEFI Partition 2 from the USB Drive. It shouldn’t matter which one you pick, Rufus installs the UEFI:NTFS chain-loader which basically allows you to boot from NTFS partitions on the second partition.
If the stars are aligned, Windows Setup should start up and setup will take place in portrait mode again, so you’ll have to deal with it:
Installing Windows
 Hit Next and go through setup like normal, but when you get to the disk/partition select screen, ensure you pick Partition 9 like the screenshot below. Installing to any other partition is a bad idea. In my case, my Windows partition is called “Intrepid”.

Once installation completes, the Steam Deck will reboot and Windows will start via Windows Boot Manager. Continue setup as normal.
If you’re installing a Professional version of Windows, skip the Microsoft account sign-in phase and create a local account instead by saying I don’t have internet to the network setup wizard. You’ll then have the option to make a local account. Thank me later.
I also would recommend not connecting the Deck to the internet until you have installed all the drivers (Protip: grab my driver pack) in case Windows Update downloads a incompatible driver and bricks your installation of Windows on your Deck.
Post Install
Once things complete, you have successfully installed Windows 11 on your Steam Deck and the two operating systems will happily live together.
However, until you install a bootloader, the only way to get back to SteamOS is to shut down the Deck and enter the Boot Menu upon startup – I’ve already given the combination out twice, just scroll up – and select SteamOS. From there, SteamOS will boot and everything will be like normal.
Unfortunately, you’ll have to do the boot menu trick every time you want to be in SteamOS unless you install a bootloader. My previous post for that has you covered.
Installing Drivers
You’ll need my driver pack for the Steam Deck, which is now available here! The driver pack includes some drivers including the AMD AS4 driver that works for some ACPI “Unknown Device” entries in Device Manager.
It also includes the Ryzen Mobile chipset driver which helps Windows understand the APU a little better and fill some gaps that the Valve drivers miss.
To put the cherry on top, I’ve included some tools to make your life easier like SteamDeckTools which allows you turn the built-in gamepad and buttons into a Xbox 360/One or DualShock 4 controller.
Where to next?
Congratulations for getting this far in the tutorial. You have successfully completed quite a few things: you’ve made both Manjaro Linux and Windows Setup USB flash drives, resized the SteamOS user data partition to make room for Windows, prepared the Windows partition for installation, and installed Windows.
Have fun with SteamOS and Windows running alongside each other!
The Sign-Off
If this guide/tutorial helped you, please consider dropping a few coins in the tip jar. It’s optional of course but I genuinely appreciate the support.
This tutorial was originally going to be in a video format, but I thought it would easier to follow if it was written. Links to where you can donate are in the sidebar, most likely at the top of the page.
Oh, and shout-outs to DashGamer for inspiring me to do this guide, since they’ve got some great in-depth Steam Deck articles.
Thanks for a great tutorial!
I just followed it, worked great, I had some notes:
-1 You can do this with one USB drive, just overwrite Manjaro with Windows after use.
-2 Check out Steam-Deck Force-SteamOS-On-Boot (https://github.com/scawp/Steam-Deck.Force-SteamOS-On-Boot) for an even more more non-destructive install with no bootloader needed
Nice find on the Force SteamOS on Boot script – that’ll be very useful if you want to go back to gaming world after doing stuffs inside the Windows environment. Thanks for that.
So the latest Steam update made SteamOS disappear on my machine. The fix (for me at least):
-1 Power up the Steam Deck to the Boot Menu
-2 Choose ‘Boot From File’
-3 Pick the 2nd ‘efi. [PciRoot(xxxxxxxxx…….’ folder
-Pick the folder
-Pick the folder (there should also be an folder if you’re in the correct ‘efi. [PciRoot(xx..’ folder)
-Click on ‘grub64.efi’
-4 SteamOS should boot, mine went through more updates and asked to reboot
-5 Switch back to Desktop mode BEFORE rebooting and re-run Force-SteamOS-On-Boot script from above.
-6 Restart and things should be fine again 🙂
Sorry typo on folder names, part 3 should be: 2nd ‘efi. [PciRoot(xxx…’ folder, then -pick “EFI” folder, then -pick “steamos” folder (there should also be an “Insyde” folder)