The first revisions of this post actually was about a specific arcade units’ motherboard, but I decided to simplify it down to something easier to digest with some arcade stuff sprinkled within.
BIOS Passwords. They’re a pain in the ass and sometimes you’ll buy a desktop, laptop or some other device that has a BIOS password on it. Sometimes this is no problem, you can remove the password via a CMOS clear.
Other times, the password can be stored in Flash Memory that can persist even after a CMOS battery pull or CMOS data clear. Or maybe even the BIOS is hard coded to require a password to enter it and can’t be changed (ie. Arcade Taito TypeX3/TypeX4 motherboards).
This guide/article will assume your system uses an AMI UEFI BIOS, aka American Megatrends UEFI BIOS. If it doesn’t, this likely won’t work. Note that newer systems may not work with this recovery method so your mileage may vary.
Step 1: Dumping BIOS Prep-Work
Dumping the BIOS can be fairly straight forward.
One step is to use a hardware BIOS flasher, with a clip that mounts directly on the motherboards’ BIOS chip. However, this can be risky and require some dexterity and skill, plus if you select the wrong voltage (ie. 5V on a 3.3V chip) then good bye BIOS chip! The other option is booting another OS and working from there. For the sake of this tutorial, we’re going down route option 2.
First, we need to get an OS that will let us dump the BIOS. For this, I used a copy of Windows 10 that I pre-installed via another machine onto an SSD and booted that on the target. If you know how to use BIOS dumping tools in Linux, use that instead. Otherwise, continue down the Windows fork in the road.
Once you have a Windows desktop on the target it’s time to move onto Step 2.
Step 2: Getting the BIOS Dump
We need to follow this guide, which is available on Github gist from en4rab. This guide was designed for a Panasonic Toughbook, but it works on arcade units and numerous other motherboards I have in my possession. Basically, you need to grab a copy of AFUWIN, run the GUI (AFUWINGUIx64.EXE) application and click Save at the bottom of the screen.
Give the file it prompts you with a descriptive name, like “Game PC BIOS backup.bin” and click Save. It will then dump the BIOS to a file. Back up this file to a USB or something for safe keeping. If the BIOS was damaged, you can repair it with this file.
NOTE: On some devices, you may get a incomplete BIOS dump until you are able to re-dump the BIOS with “ME Image Re-Flash” option enabled. Your mileage may vary.
Step 2 is now complete unless you have gotten an error message.
Step 3: Show me your secrets
Now, you need to get UEFITool NE. You can get it from the page here: https://github.com/LongSoft/UEFITool/releases . I used the UEFITool_NE_A58_win32.zip release.
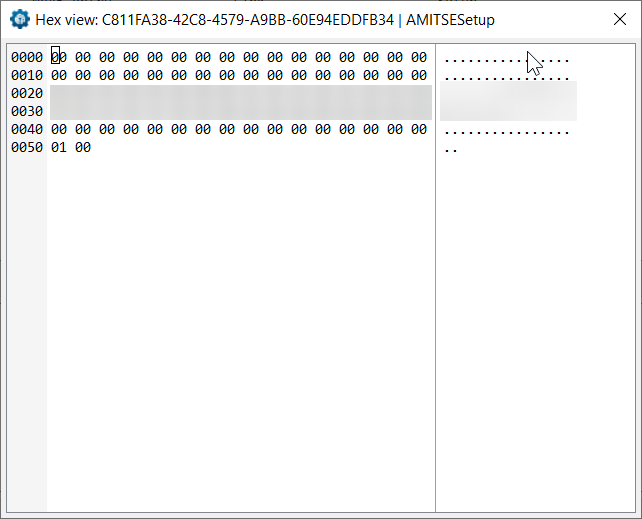
Extract this somewhere on your desktop, and run the executable inside. Now go to File and then Open Image File. Locate the BIOS dump you acquired earlier. In the screenshot below, I’m looking at the contents of my Taito TypeX4’s BIOS dump I created myself. You want to find AMITSESetup, which has a GUID of C811FA38-42C8-4579-A9BB-60E94EDDFB34.
 Once you find it, right click and choose Body Hex View from the pop-up menu.
This will give you something like this, I have censored the contents of the NVRAM value as it may contain a password for other TypeX4 arcade units in service. I do not want to put other units in the wild at risk of users with malicious intent damaging them. Sorry, but it is what it is!
 For this example, on the TypeX4 there is no admin password, there is only a user password, and it’s stored in plain text (thanks Supermicro for the oversight). So, all I had to do is write this down and enter it at the Password Prompt when pressed the key combo required to get into the BIOS on that unit.
You may also see some passwords stored like “H.E.L.L.0”. The dots are apparently used for UTF-8/UTF-16 double-byte characters (I could be wrong here), so ignore them. Using the example password, your password would be “HELL0” ignoring the dots. Capitals/Lowercase matters. hell0 is not the same as HELL0.
If you have a clear text password like above, congratulations! Your job is done. That will get you in. However, let’s say you got hashes or characters that don’t seem to make sense… then we need to do some magic.
Step 4: Did anyone see my magic wand?
Now, in the above screenshot, you can see that my AMITSESetup NVRAM body section is 0x51 bytes in length. To figure out the admin and password boundaries, we need to take the length of the body values which is 0x51, subtract 0x01 (now 0x50) and divide it by two.
This will give you a result of 0x28, which is a 40 byte container. If you use a hex editor, you can copy 0x28 hex (40 decimal) bytes from the start of the area where the password hash begins. Then you need to do some XOR magic by following the original guide that’s on the GitHub gist on how to XOR the values with a UEFI master password XOR key and hopefully you’ll get a BIOS password that works.
If you don’t, then unfortunately you are probably going to need to ask for help on that gist thread, or if it’s a PC you purchased from some seller, ask them for the password (or try a CMOS wipe/reset if it’s a consumer-grade motherboard).
Further reading and closing remarks
I strongly recommend you make sure you read the thread on the Gist as it will help shine light on the whole process although it’s more in-depth and technical.
Note that motherboard versions can play a big role, especially when repairing a motherboard that might look the same as yours, but it’s actually a hardware revision newer or older than yours.
Some motherboards can go through 5 or 6 revisions and the BIOS can differ for each one, so the dump of yours may not work on a newer/older revision. It is advised to put the make and model of the motherboard in the file name of your BIOS dump to help aid you later.
Good luck!
Fun fact: The motherboards used in most arcade units (excluding some Konami systems and ones from other exotic companies) are sourced from common manufacturers. For example, the Sega Nu 1.1 motherboard is Advantech, while the Sega Nu2 and ALLS UX/HX series motherboards are Gigabyte. A Capcom unit of mine uses a motherboard made by ASRock.
I have the same problem with recover the AMI bios password from a flsh dump. However, I am not lucky enough when searching plain text within an “AMITSESetup” entry. In this entry, its data are ALL zero.
And it also doesn’t contain any entry named a GUID serial number with “AMITSESetup”.
I just want to konw there is any pattern with an entry stored password? How can I search the password in UEFITools.
Thank for reading and hope for reply:)